

Manually copying WooCommerce orders into your accounting software is error-prone busywork. Connecting WooCommerce to Xero syncs orders, invoices, payments, and inventory automatically — every sale lands in your books correctly categorized. This guide covers the integration options in 2026, from the official Xero extension to sync tools like Zapier, and walks through setup step by step. (Updated August 2026.)
By connecting Xero and WooCommerce, you can take care of all your accounting needs, such as inventory, sales reports, billing, and much more. It also syncs in your WooCommerce data and organizes it in a single place so you can have a clear view of your business performance.
In this article, we will guide you through the integration process of Xero and WooCommerce. But first, let’s learn more about it.
Learn about the top WooCommerce Development Agenices to manage your store
About Xero

Xero is an accounting solution that is perfect for small businesses, accountants, and bookkeepers. It enables you to automate everyday tasks of your business such as updating inventory, adding orders in a spreadsheet, paying bills, maintaining bank connections, and much more.
It also has an accounting application, which means you can access your business from anywhere and manage finances on the go. With the accounting app, you can notify clients immediately and get paid faster, you can create and manage invoices, match bank transactions to bills, and much more.
Moreover, you can start using Xero for free in their 30-days trial period. Or choose from one of their pricing plans, i.e Starter ($20/mo), Standard ($30/mo), and Premium ($40/mo). The plan you choose depends on your business size. You can also increase functionality by choosing available add-ons, such as Claim expenses, Track projects, and Analytics Plus.
Learn how to Use WooCommerce Anti-Fraud plugins to protect your store
Functions and Features
Xero for WooCommerce has multiple features and functions that can help you simplify your accounting and reduce the time, hassle, and money required to manage these backend tasks on a daily basis. Let’s look at some of its features in detail.
Inventory

With WooCommerce Xero integration, you can easily track inventory across both channels in real-time. Any changes made in WooCommerce will automatically be updated in Xero and vice versa. You can easily track the stock level of each item, see which products are selling the best, and sync all product information like description, price, notes, etc.
Moreover, you can manage inventory across multiple channels all on a single Xero dashboard. Thus, reducing the chances of overstocking or running out of items.
Automate inventory with the best WooCommerce Inventory Management Plugin
Invoice
WooCommerce Xero also has an intuitive invoicing software that enables you to send invoices from your mobile or desktop as soon as an order is placed. You can customize the invoices by adding your company name, logo, and also required fields, such as customer’s name, address, order information, discounts, etc.
You can also mark your invoices as paid, draft, or pending payment. Once the payment is made, the invoice is emailed to the customer. This is great for keeping track of all your orders and payments in a single place.
Contact Management

Another important aspect of a business is managing its customers and clients for improving customer engagement, gaining insight regarding customer trends, devising strategies, and retargeting customers.
With WooCommerce Xero integration, you can manage contacts by organizing their invoices and payments together. You can also segment customers into groups and lists depending on their searches. Moreover, you can create your email list and promote your business through email marketing.
Tackle some of the common WooCommerce problems and How to Avoid them
Payments

Xero also simplifies the payment process by enabling customers to pay online using their credit and debit cards. You can also use Stripe to allow more payment options like Apple Pay, Google Pay, or choose any of your favorite payment solutions.
You can also add a “Pay Now” button is your invoices, linking it to a payment solution so your customers can pay you instantly. It provides robust security and encryption, making sure your data is safe and secure.
Reporting

The major reason for using Xero on your WooCommerce store is that you can get a detailed overview of your store’s performance. Xero provides multiple reports on different metrics so that you can see where you need to improve.
The financial reports are kept up-to-date and you can measure specific KPIs as well. You can also customize your reports by adding and removing fields, adding formulas and notes, and setting reports schedules.
You can share reports with your teams, view them in a listed or graph format, and compare your goals with actual results. This detailed view is great for pinpointing areas of improvement and success.
And there is so much more you can manage using WooCommerce Xero, such as capturing data, bank reconciliation, quotes, and sales tax. By automating these tasks, you can work on more important aspects of your business, such as marketing and customer acquisition.
Keep an eye on important metrics with the best WooCommerce Reporting and Analytics tools
How to Integrate WooCommerce with Xero
You can integrate Xero into WooCommerce using plugins. For this guide, we will be using the Xero for WooCommerce plugin. Let’s get started!
Xero for WooCommerce

Xero for WooCommerce enables you to create invoices automatically for all WooCommerce sales. You can also sync data like product information, shipping, discounts, taxes, etc between WooCommerce and Xero.
Follow the step-by-step instructions below to install and configure the plugin.
Step 1: Installation
First, you need to purchase and download the plugin “Xero for WooCommerce” from the WooCommerce marketplace. Then go to WooCommerce > Plugins > Add new, click on “upload plugin” and upload the file you just downloaded. Then install and activate the plugin.

Step 2: Configuration
To connect your WooCommerce and Xero account, you need to follow these two steps below:
Create Application in Xero Developer Portal
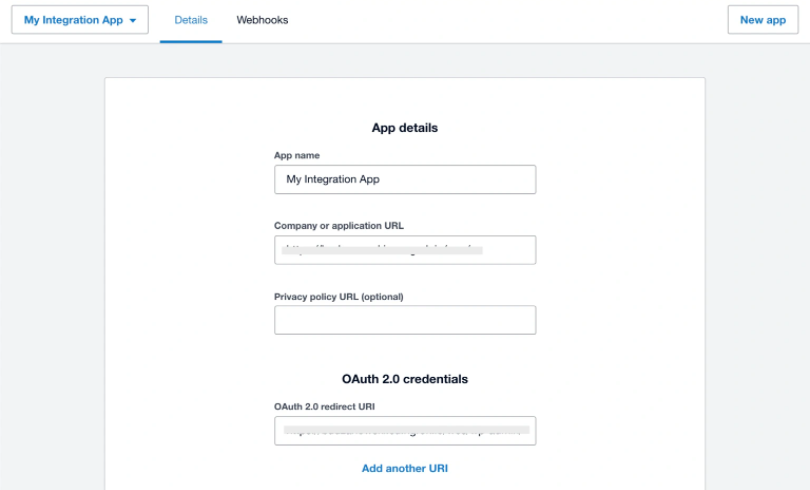
First, create an account on www.xero.com and then log in to the Xero Developer portal > My Apps tab and click on the “new app” button. A form will appear, fill in the required fields, i.e App name is the name of your business. Next, in the OAuth 2.0 grant type, choose the “web app” option. Then add the URLs required. The OAuth 2.0 redirect URL can be found in the WooCommerce Xero settings in the wp-admin panel. Your application is ready, but do not close the page yet.
Connect Application to WooCommerce
Copy the client id in the form above and paste it in the “client id” field in the WooCommerce Xero admin settings page. Then, go to the Xero application and click on “generate a secret”, then copy this as well and paste it in the “client secret” field. Then, click on the “save” button at the bottom of the Xero application page and do the same at the WooCommerce Xero settings page.
A “Sign in with Xero” button will appear in the authenticate field. Click on it to complete the connection process by logging in to your Xero account and choosing your organization.

Step 4: Set Up Account Codes
To sync in invoicing and payments, you need to enter the account codes provided by Xero. For this, go to Xero dashboard > Accounting > Charts of Accounts.
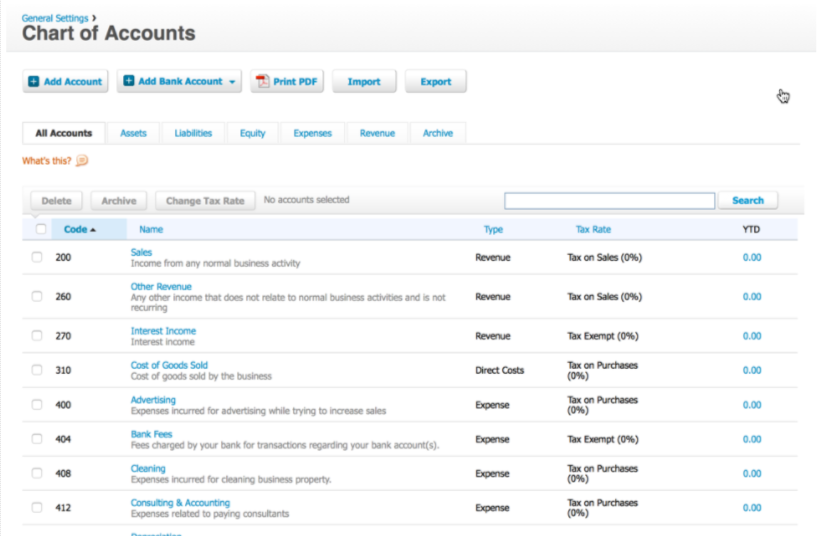
Every data, such as sales, taxes, etc. will have its unique code, which you can customize or use the default ones. Copy the code and paste them in the correct field at WooCommerce > Xero.
And that’s it! Your WooCommerce store is successfully integrated with Xero and you can streamline your workflow by automating finance reporting and bookkeeping.
Learn why WooCommerce is the most Flexible eCommerce Platform in our detailed article
Wrap-Up
Once connected, reconcile a few test orders end-to-end before trusting the sync, map your tax rates carefully (the most common source of errors), and review the sync log monthly. Accurate books beat fast books — but with WooCommerce and Xero connected properly, you get both. Guide re-verified August 2026.


