
One of the surest ways to increase sales and conversions on your site is by offering multiple payment options for your customers. Lack of payment options is one of the reasons why customers abandon their cart at the last moment, around 70%. That’s a huge percentage of sales and if we can recover even a quarter of it, that would be highly beneficial. Nowadays, people want accessibility and convenience, either paying online or in person. One such option is Apple Pay for WooCommerce. Apple Pay enables customers to pay from their phones without entering their info again and again. This results in faster checkout and increased trust as customers recognize an option they have and trust to use.
In this article, we will guide you through the WooCommerce Apple Pay integration process.
Stripe vs PayPal – What’s the Best Payment Option for WooCommerce Stores?
About Apple Pay

Apple Pay is a digital wallet payment solution that enables its users to pay for their purchases using their mobile devices. How is it different from online transactions? Because users don’t have to enter their credit or debit card info every time they use it. It is extremely easy to use and set up. All you have to do is add the information in the mobile wallet app and benefit from contactless payments, built-in security, and faster checkout.
Since it’s built for the iSO ecosystem, customers will recognize this payment option specifically added to cater to their convenience, thus personalizing the checkout process, which is always a plus point.
The more payment options you provide, the better your lead generation. Thus, to offer this option to your customers, read our guide below.
Learn How to Manage Refunds on WooCommerce using plugins
Easiest Way to Integrate Apple Pay to WooCommerce
Integration of Apple Pay on your WooCommerce store is pretty simple. All you need is a WooCommerce site, Stripe plugin, and a Stripe account.
We can only add the Apple Pay option in WooCommerce using plugins, and Stripe supports Apple Pay, AliPay, and much more, so it’s the best option out there for this guide.
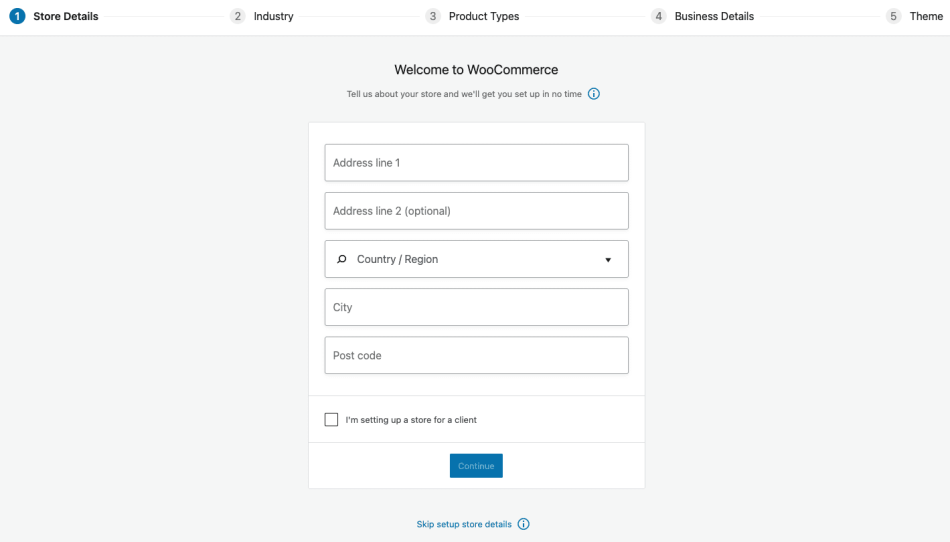
Step 1: Set Up WooCommerce
First, you need to set up your WooCommerce store. For this go to WordPress > plugins, and search for WooCommerce. A Setup Wizard will popup which will help you include your store information, such as name, industry, product type, locale, etc. Then you can choose a theme, create products, set price and taxes, and shipping methods. Once a basic website is created, we move on to the payment gateway section.
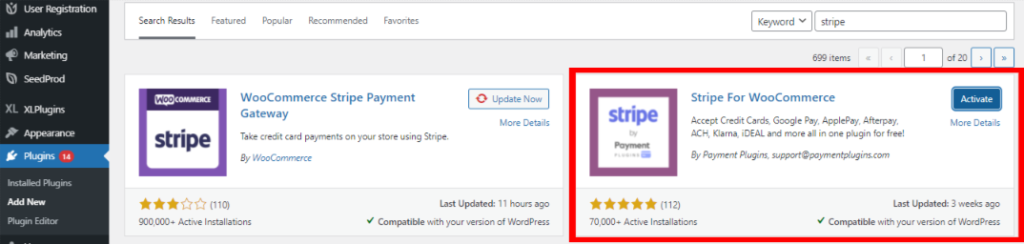
Step 2: Download and Configure Stripe for WooCommerce
Now to add Apple Pay for WooCommerce, you need to create an account on Stripe on its official website. You have to add your business and bank information. Then you need to install the Stripe payment gateway plugin on WooCommerce. For this, go to WooCommerce > Plugins > Add New, there you need to search for Stripe for WooCommerce plugin and install and activate it.
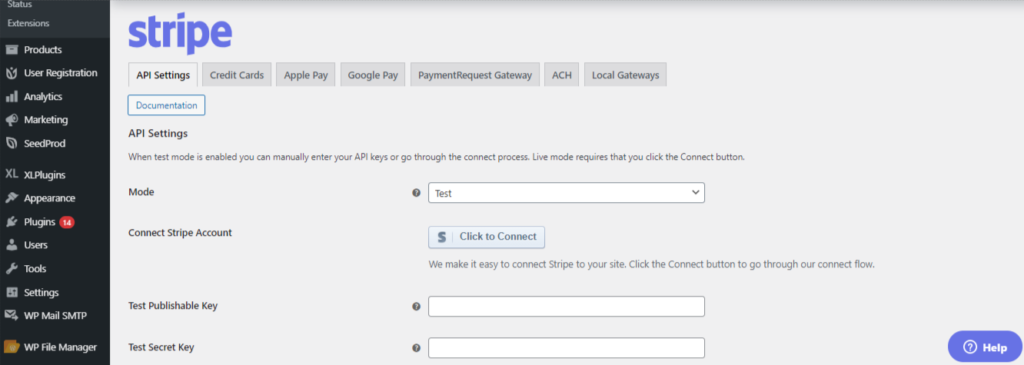
After this, you need to link Stripe to WooCommerce. For this, go to WooCommerce > Settings, click on the Payments tab. There you will find multiple payment options, for now, turn on the “Stripe Credit Card” option. Then click on the “manage” button to further configure the plugin.
On the new page, go to the API Settings section, and connect your Stripe account by clicking on the “click to connect” option. You will be directed to a third-party page where you have to choose the Stripe account you want to connect. Once connected, a publishable and secret key will automatically be generated and added into their respective fields. Don’t forget to click on “save changes” at the bottom of the page.
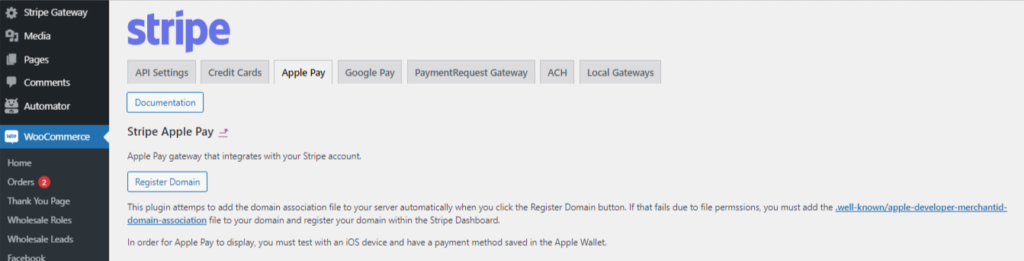
Step 3: Add an Apple Pay Button
To add the Apple Pay button for WooCommerce, go to WooCommerce > Settings > Payments, click on the “Stripe” tab to register your domain. This is done automatically. To avoid any errors, go to the Stripe dashboard > Payment methods > Stripe, where you can see your domain listed. If not, go to WooCommerce Apple Pay settings and manually upload the right verification document.
And that’s it! Your WooCommerce Apple Pay button is added to your checkout page.
Checkout our step-by-step guide to Set-Up Stripe Payment Gateway for WooCommerce
Customizing the WooCommerce Apple Pay Button
If you want to change the look of your WooCommerce Apple Pay button, then go to WooCommerce > Stripe Gateway > Settings and click on the “Apple Pay” tab. Here you can enable the Apple Pay option, add a title, description, and choose on which page the Apple Pay for WooCommerce button appears.
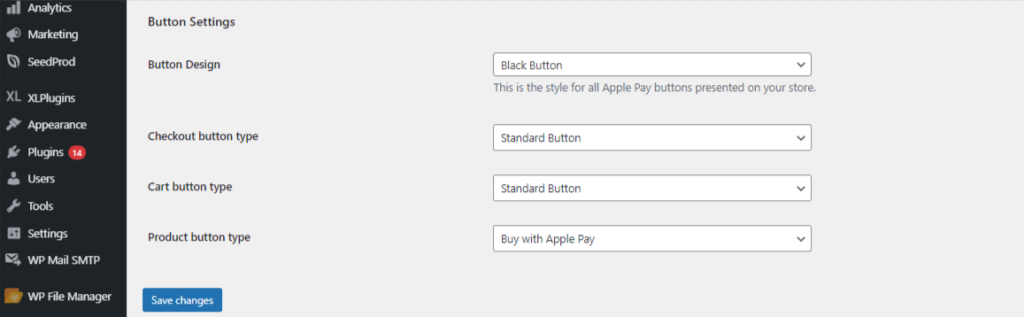
Moving on to the button design itself, you can change the color from black to white or white with a black line. Moreover, you can also change the button text to “Buy with Apple Pay” or “Checkout with Apple Pay”. Don’t forget to click on “save changes” at the bottom of the page.
Learn How WooCommerce is the most Flexible ECommerce Platform among others
Wrap-Up
Adding the Apple Pay button on your WooCommerce store is a great way to provide more options to your customers and enable a safe and secure way for customers to pay for their purchases. Mobile wallets have been increasing in popularity due to their contactless payment feature and will continue to do so. In-person or online, this is a good option to have on your WooCommerce store.


